
🎬 Welcome to AutoReel Studio: Your New Real Estate Video Editor

If you're already using AutoReel to create stunning listing videos with a single click, you're going to love what’s next.
Introducing our biggest update yet: AutoReel Studio. AutoReel Studio our brand new, built-in video editor that lets you customize your videos like a pro, without needing to be one.
From adding intros and outros to additional video clips, trimming scenes, inserting music, and customizing text — AutoReel Studio gives you complete creative control. The best part? It's Free. Every AutoReel Plan includes Studio and unlimited renders, no video credits needed.
Let’s walk you through how to use it, step by step.👇
Full Walkthrough Video Guide
If you want a full walkthrough video guide of the steps, refer to the full walkthrough video here at any time. If you prefer written steps to skim through, keep on reading below.
Full video walkthrough of AutoReel Studio.
✨ Step 1: Start with an AutoReel Generated Video
If you plan to use the AutoReel Studio to edit your video, we recommend skipping the customization options (intro, outro, logos) when generating the original AutoReel video – this way you'll have full control over it in the Studio Video Editor.
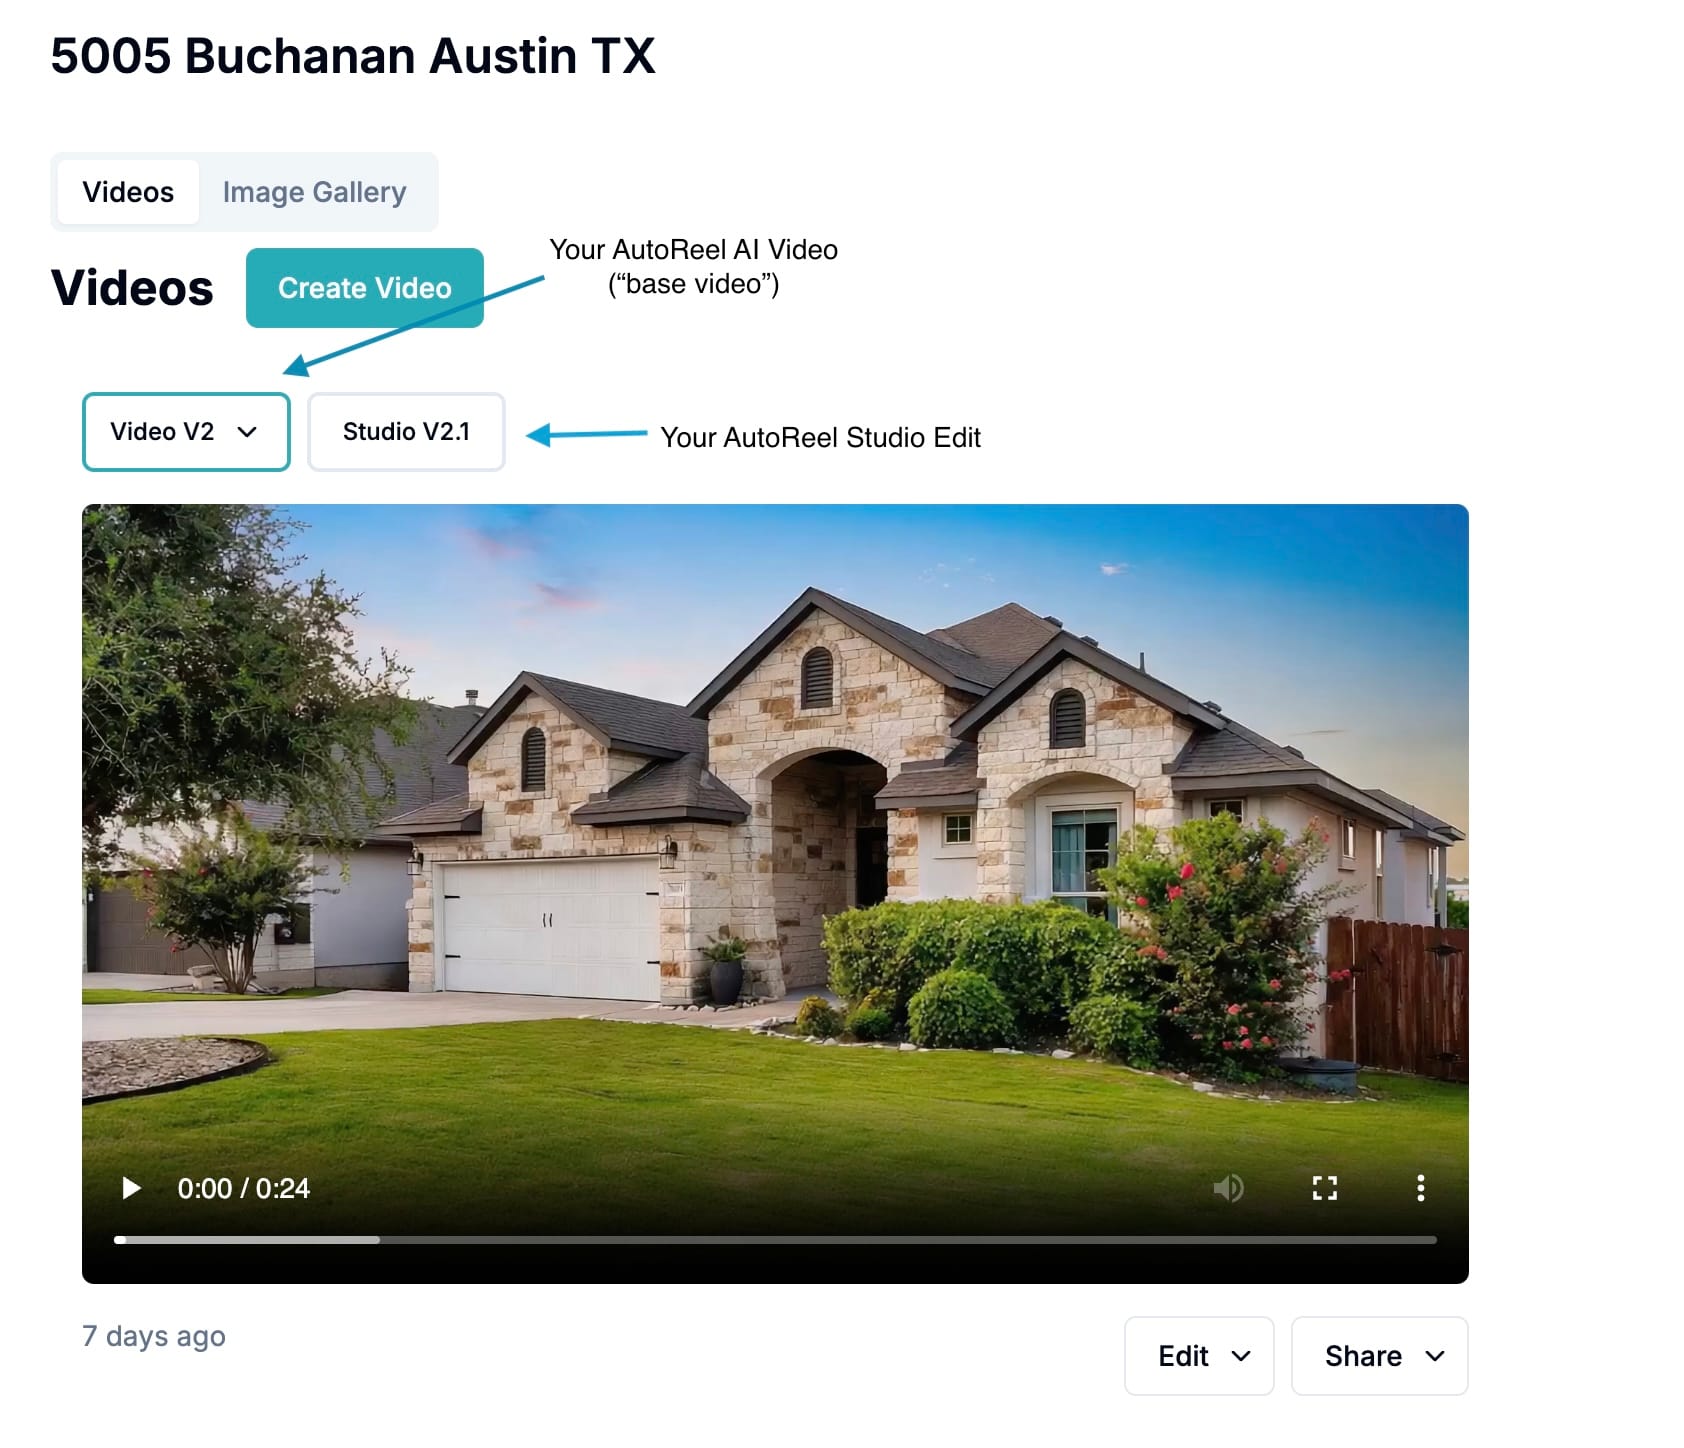
Once AutoReel renders your video from selected photos, you’ll see it under the Videos tab on your property page. Use the dropdown to switch between different versions:
- AutoReel Video (AI-generated base video)
- Studio Edits (your custom edits using AutoReel Studio)
If you haven’t created any Studio Edits yet, only the AutoReel Video version will appear.
🎛️ Step 2: Open AutoReel Studio
To begin editing, click the Edit dropdown and select Studio.
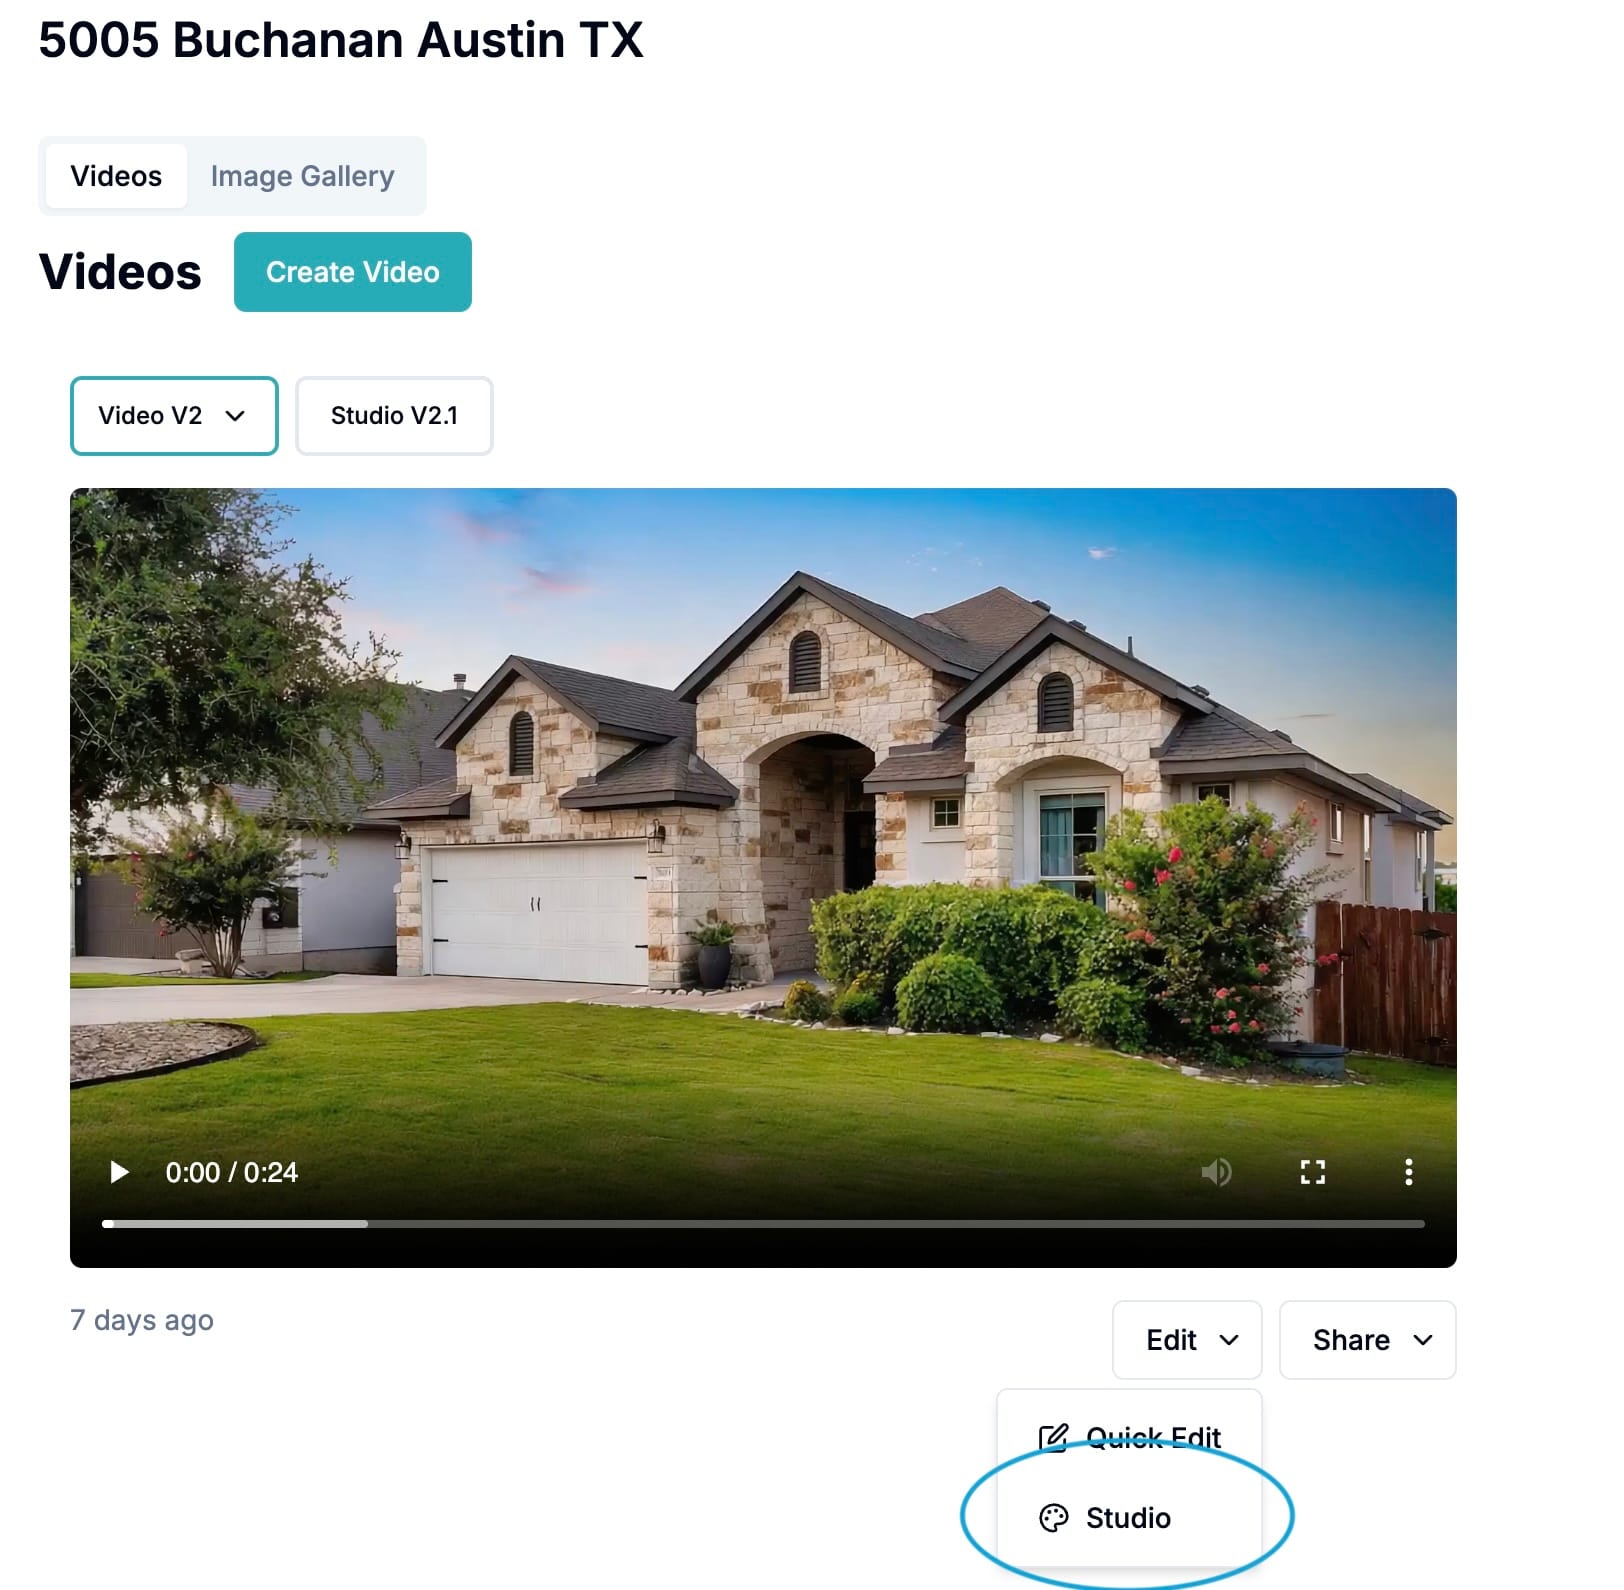
This opens the full AutoReel Studio interface where you can customize your video timeline, visuals, and more.
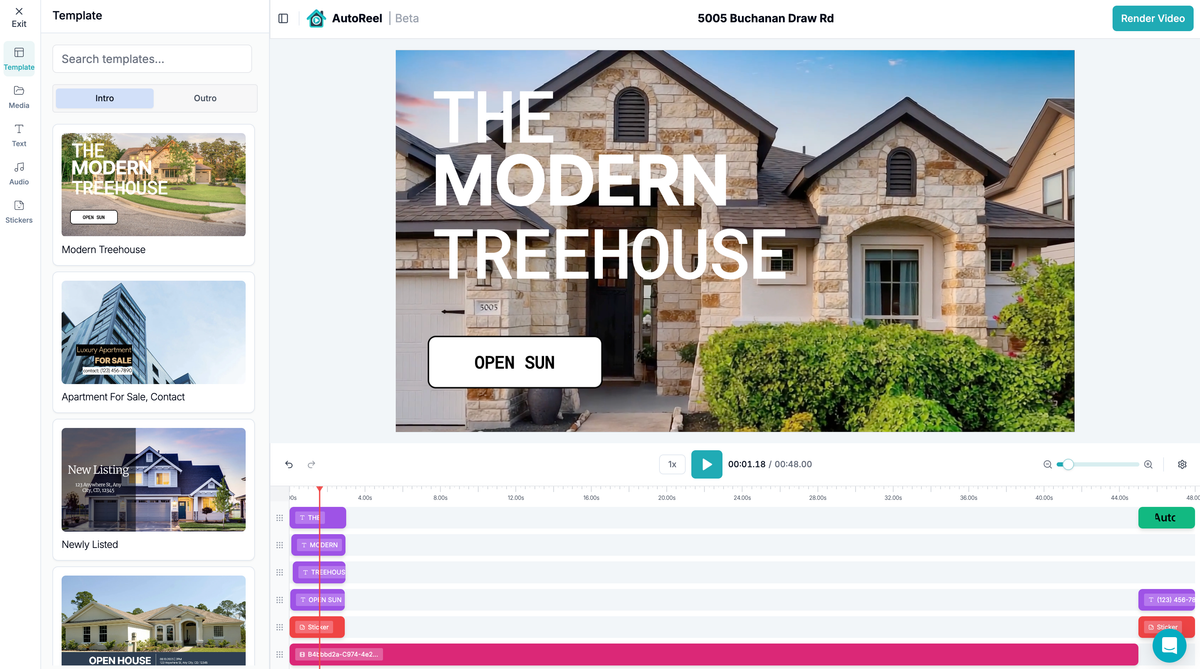
🎨 Step 3: Choose Your Intro
First impressions matter. Add an intro template to the start of your video from our Template Library on the left panel.
Use our pre-designed slides to promote open houses, highlight features, or just brand your video. Note that this is just a starting set of templates and we will be launching more new templates soon.
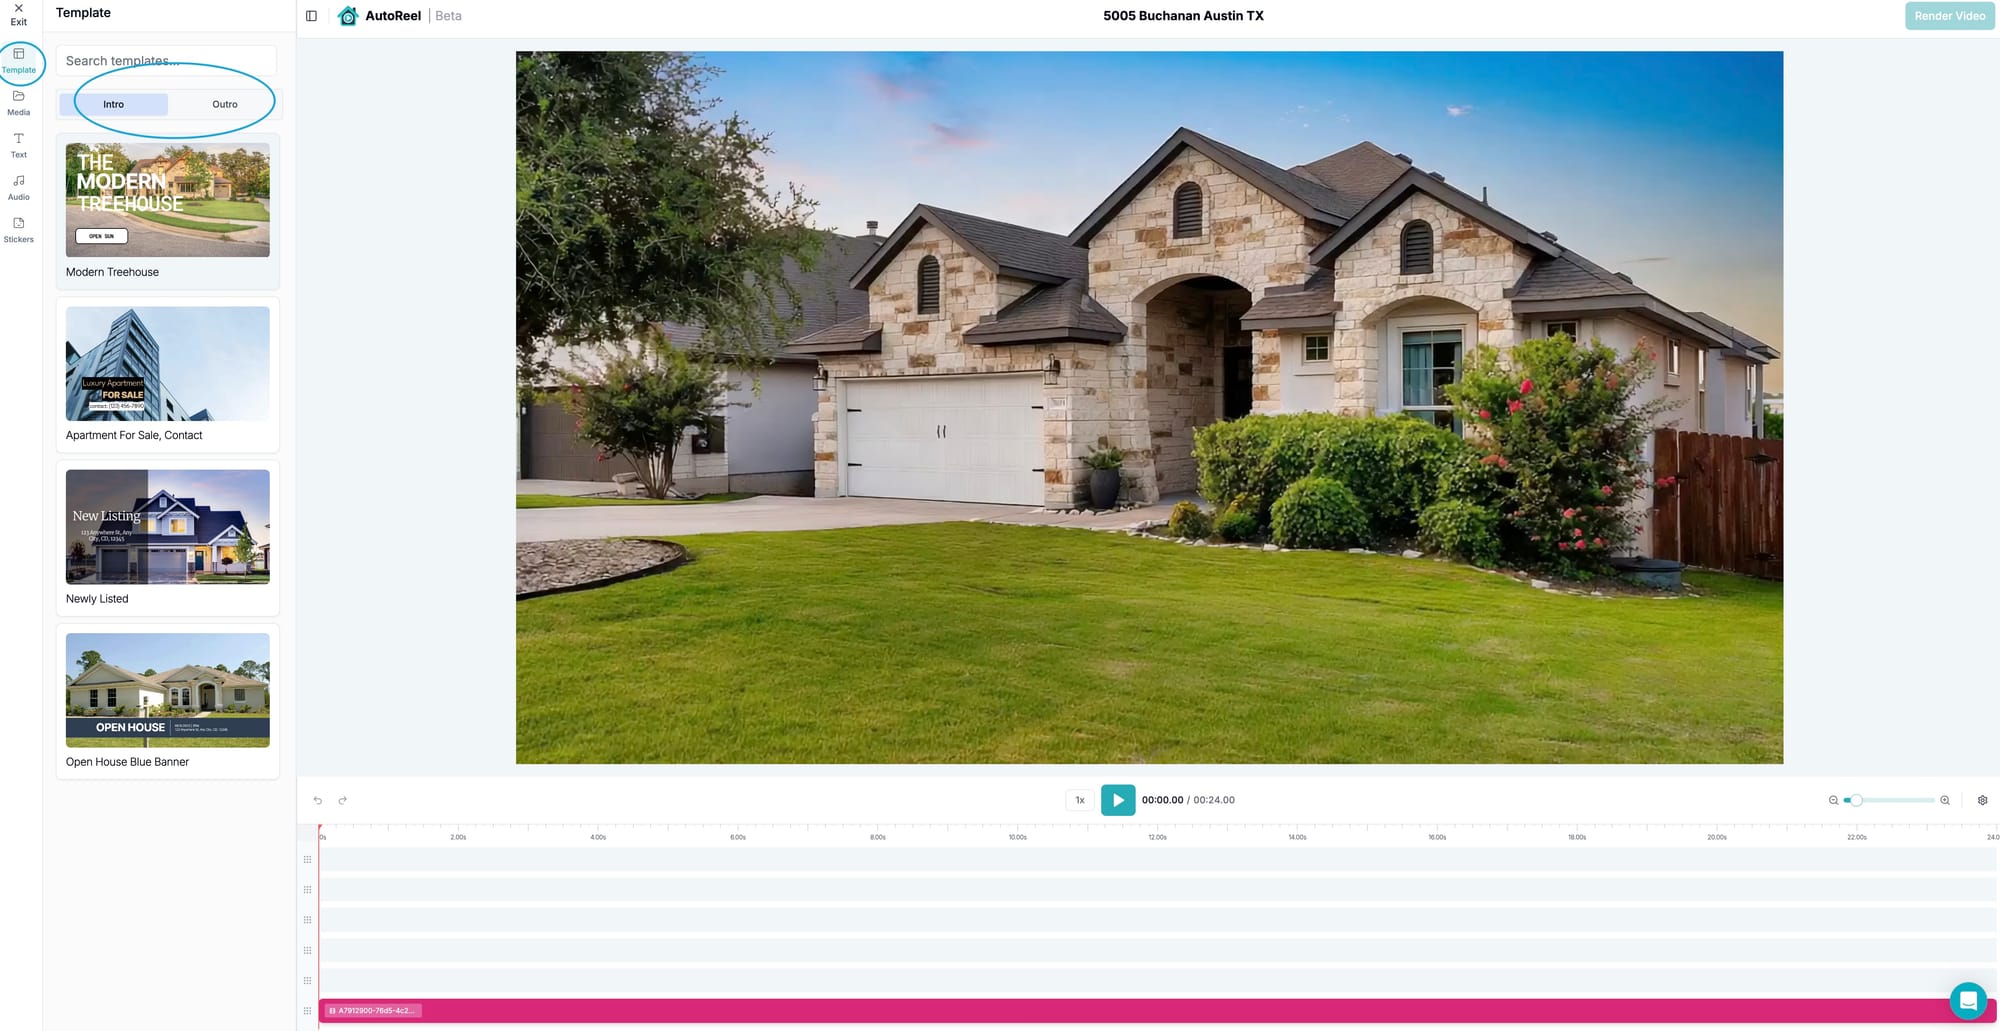
Select an intro template that matches your style and desired look.
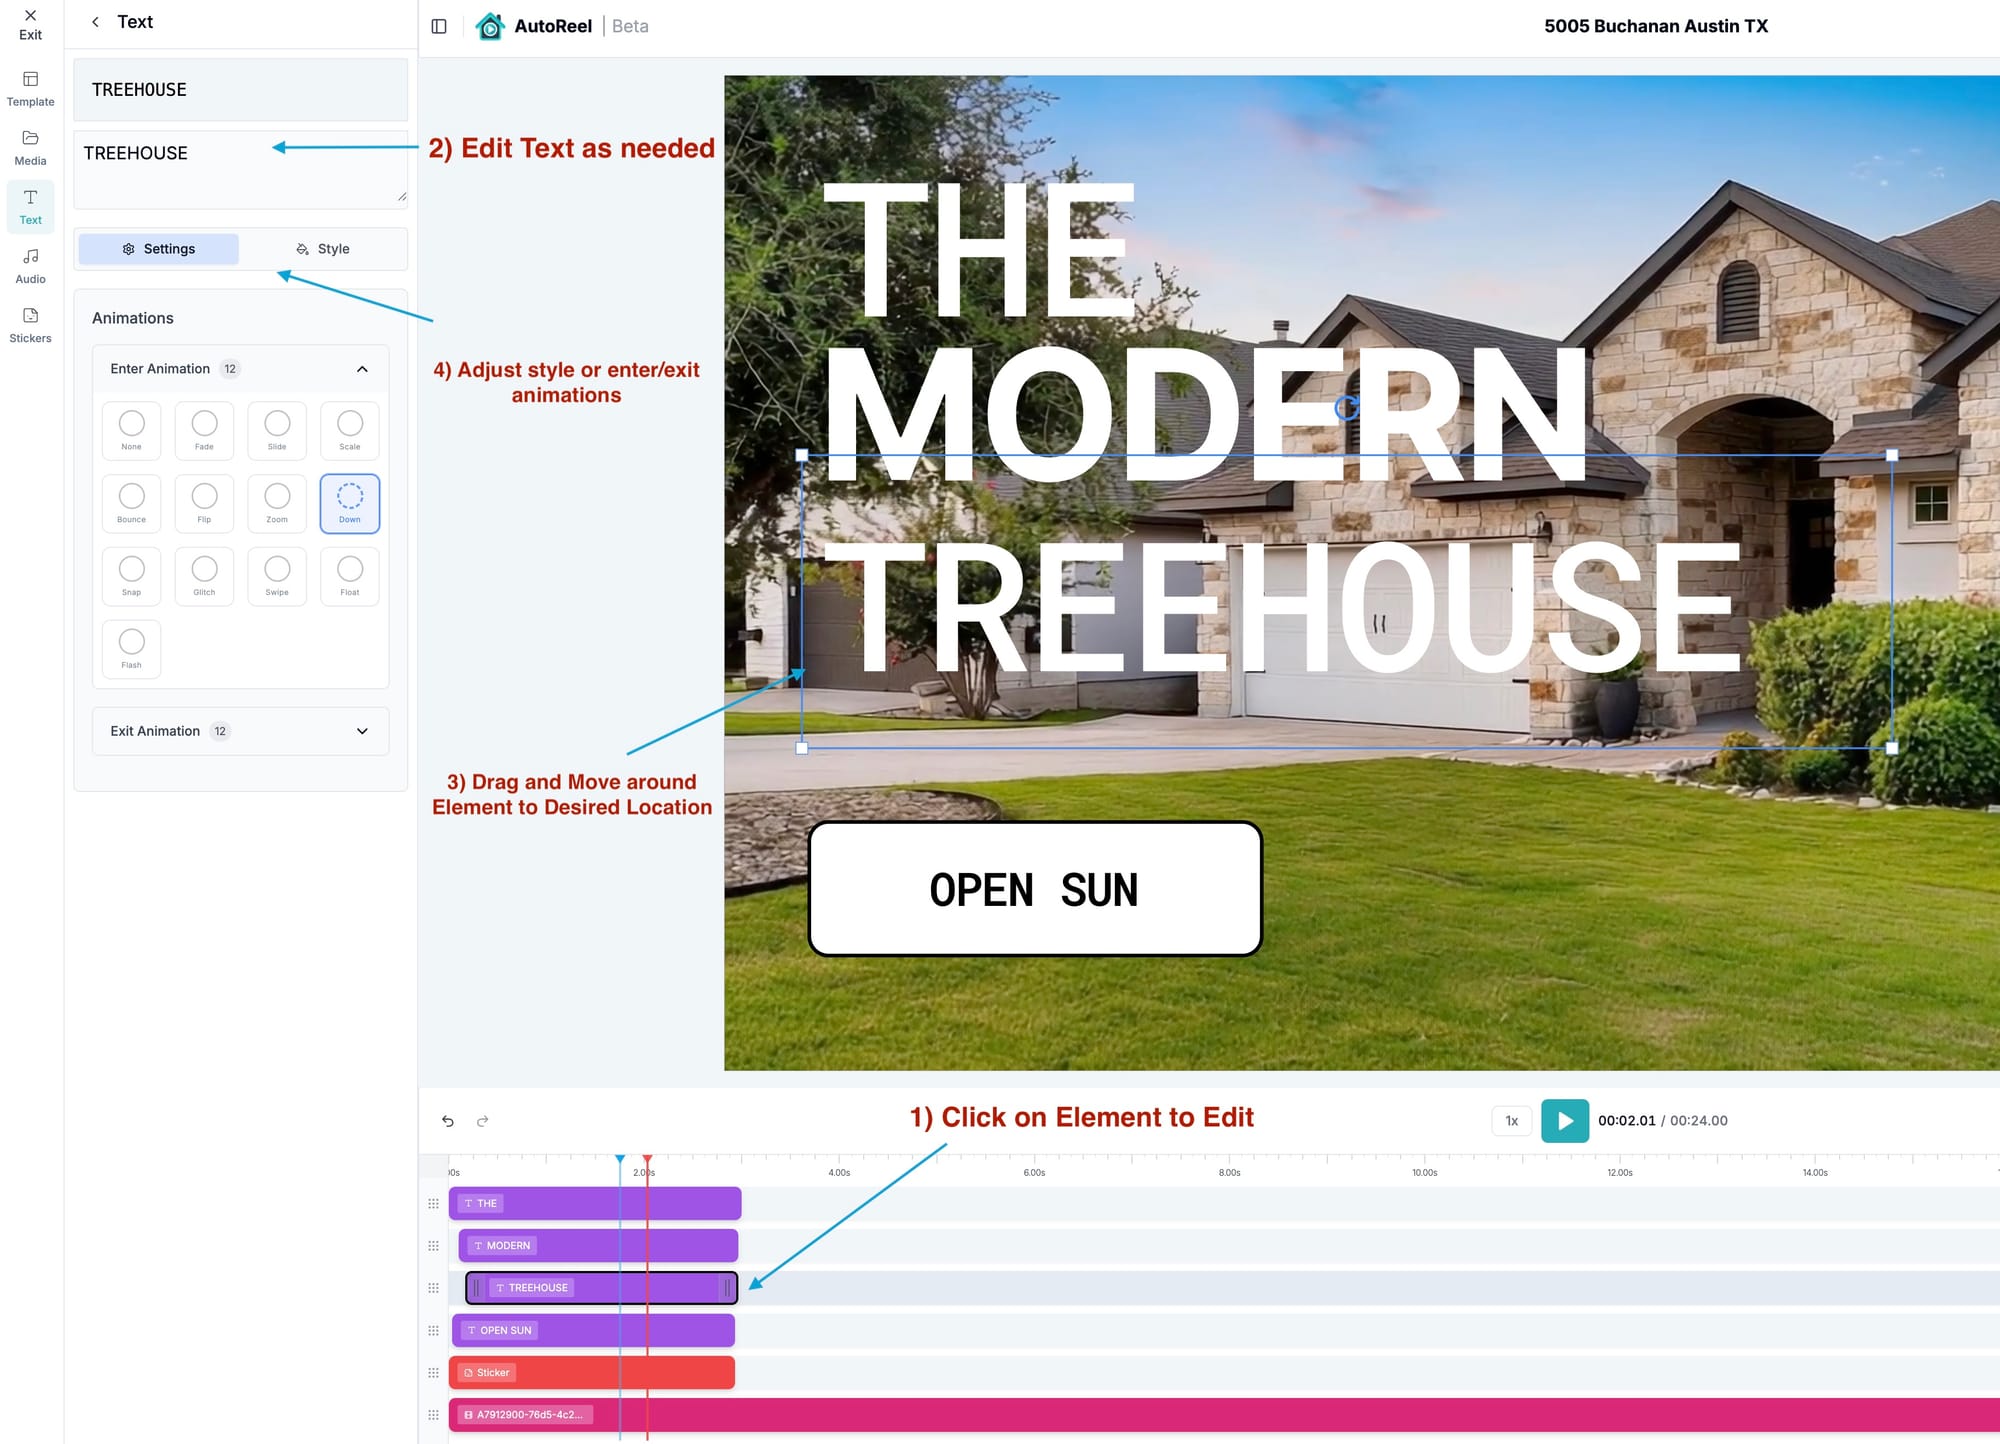
Once you’ve selected your intro template, it’s time to make it yours. Follow these steps to easily customize the text and layout:
1. Click on the element you want to edit in the timeline (e.g. text like “Treehouse” in the example above).
2. In the Text panel on the left, update the content to match your listing details — such as the property name, open house timings, or other callout.
- (Optional) Drag and reposition any text block to your preferred spot on the video preview screen.
- (Optional) Use the Animations section to customize how text enters and exits — choose from fade, slide, zoom, and more.
This gives you complete control over the look and feel of your intro, so it aligns perfectly with your brand or listing.
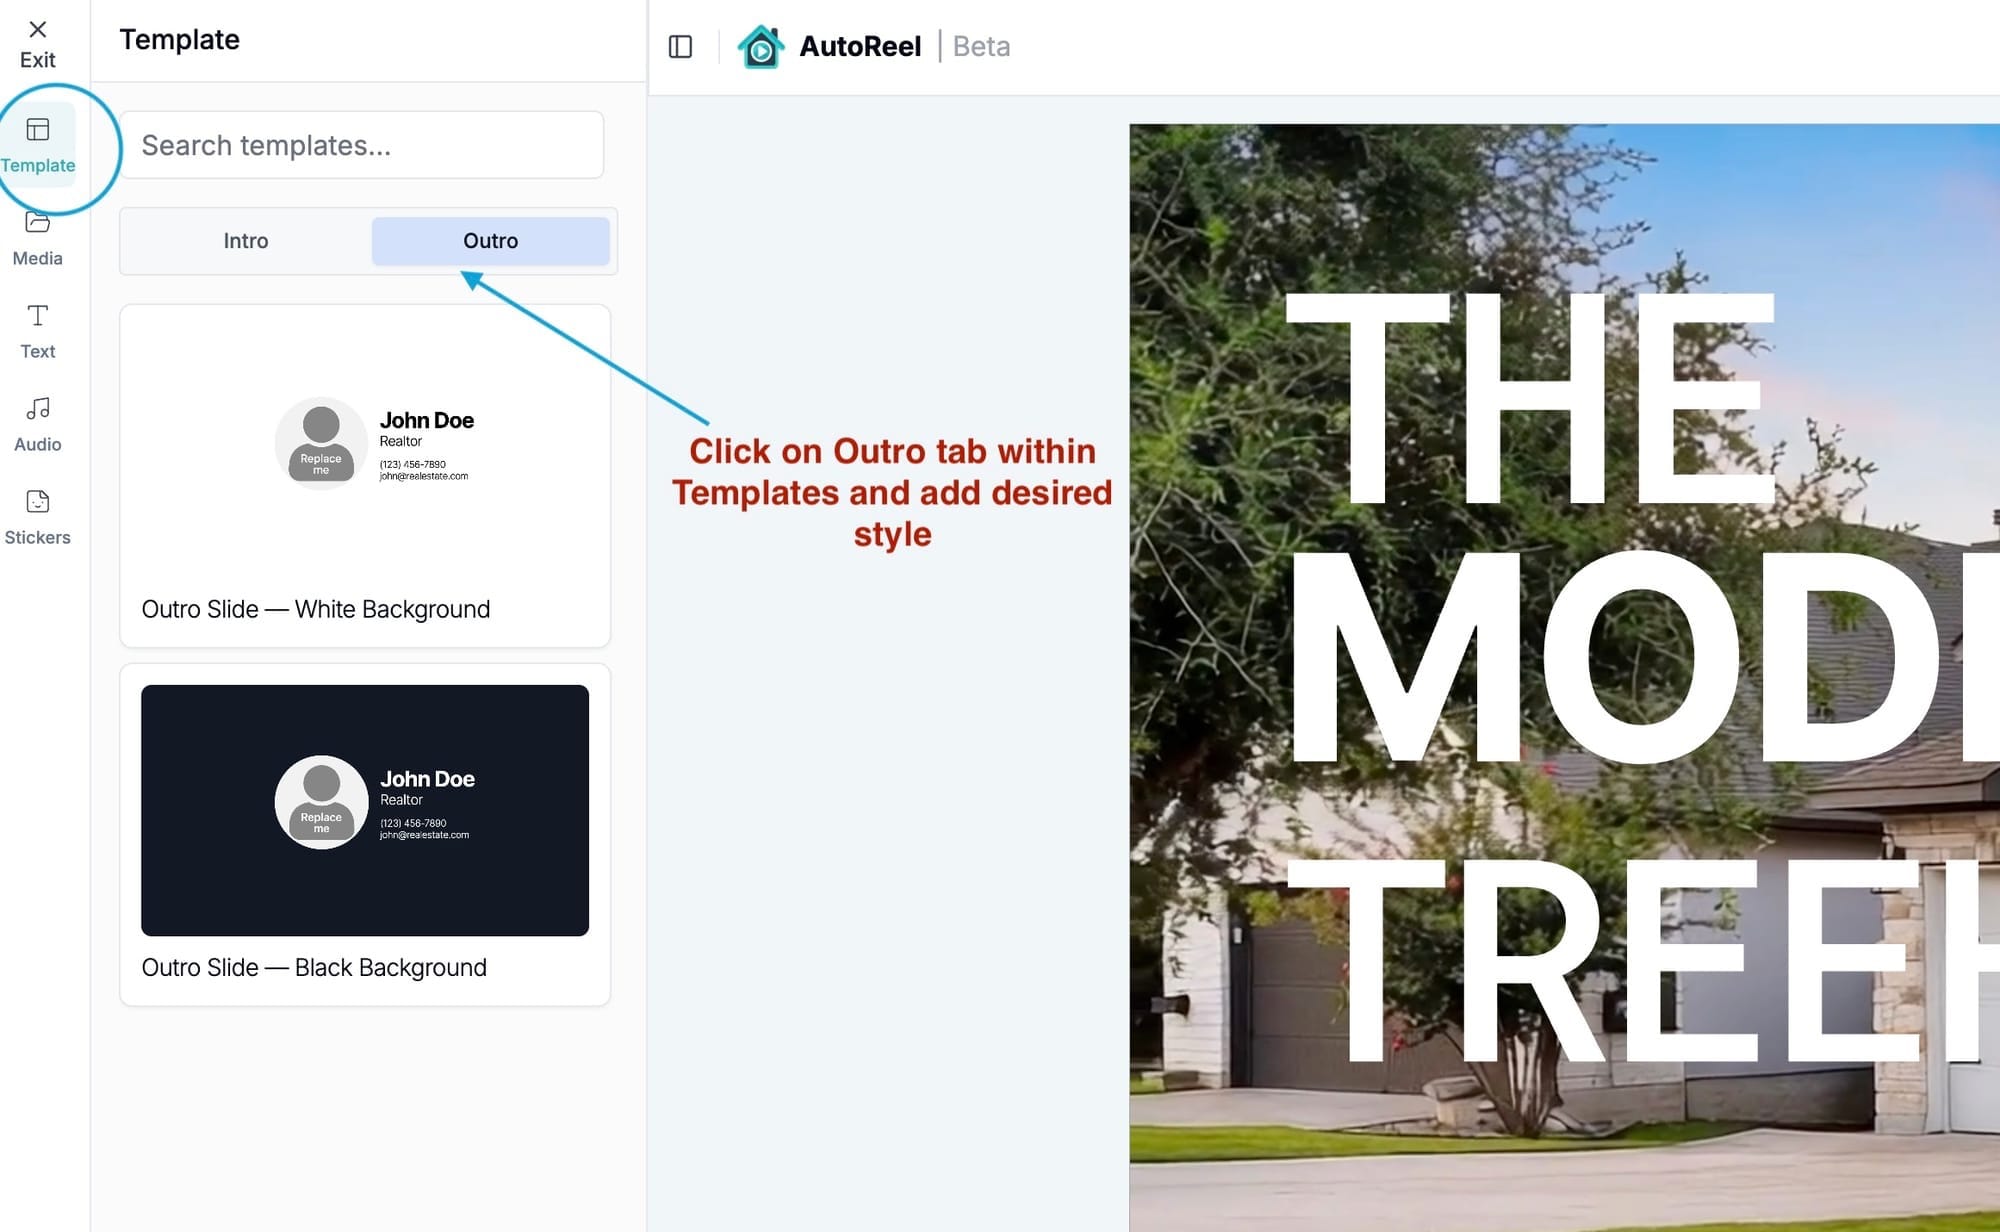
🏁 Step 4: Add an Outro
Give your video a strong finish by choosing from our Outro templates — great for showing agent details, contact info, or brokerage branding.
Click “Outro” inside the Template tab and add your preferred style onto the end of your timeline.
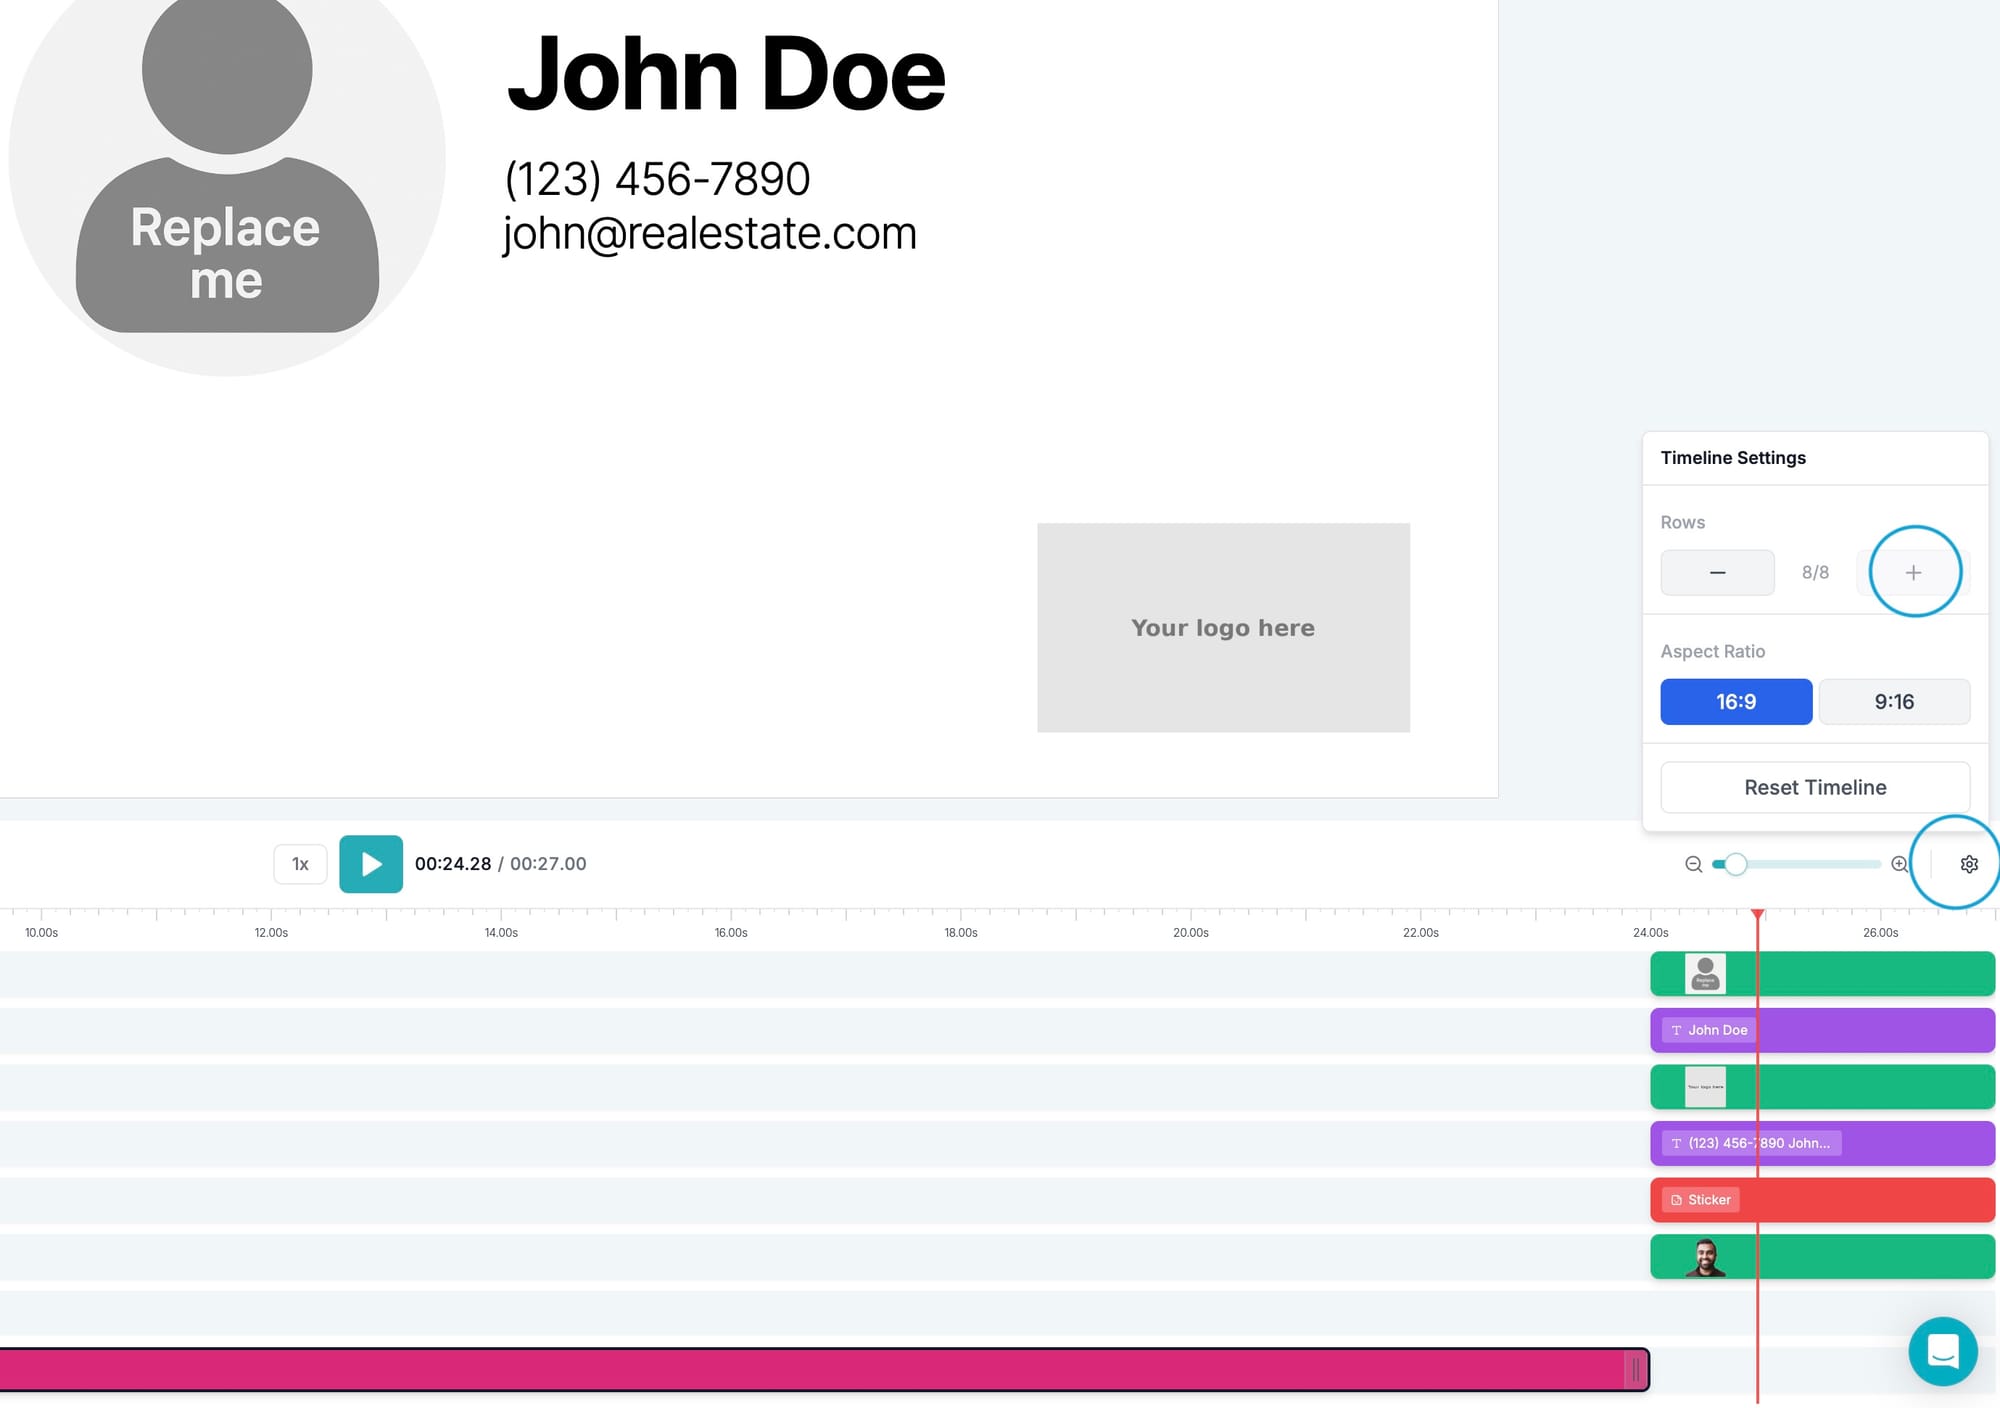
Then, customize the layout by uploading your own profile photo and branding assets as needed, and clicking on them to Add to timeline when prompted.

In some cases, you may need to add more rows to the timeline to have room for your newly uploaded assets, which you'll use to replace the template placeholder profile photo and logo. To do so, click the Gear on the right of the player and the "+" plus button to add more rows.
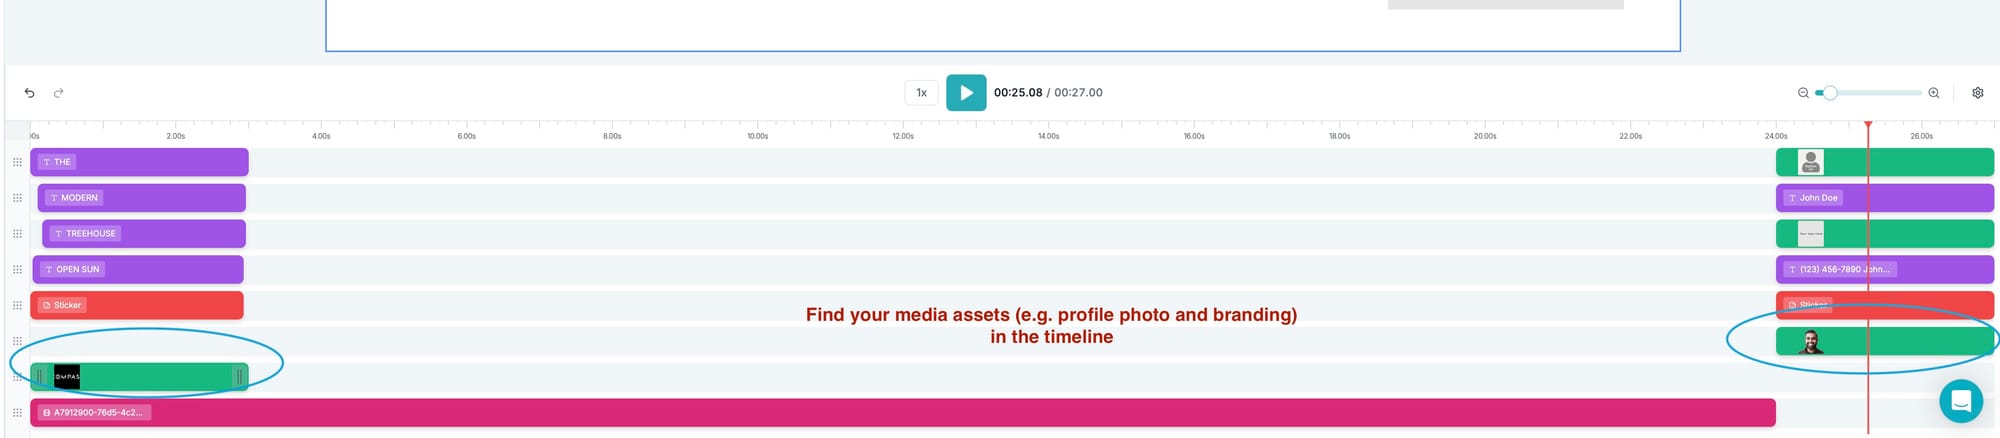
Upon initially adding the photo assets, they will be inserted in the timeline where there's given space, typically either at the beginning or ending:
Now, replace the placeholder profile photo and logo assets with your uploaded assets. You can either click on the placeholder elements and press "delete" on your keyboard, or right click on the element to delete it. Drag and reposition your profile photo and logo assets into where the placeholder elements were.
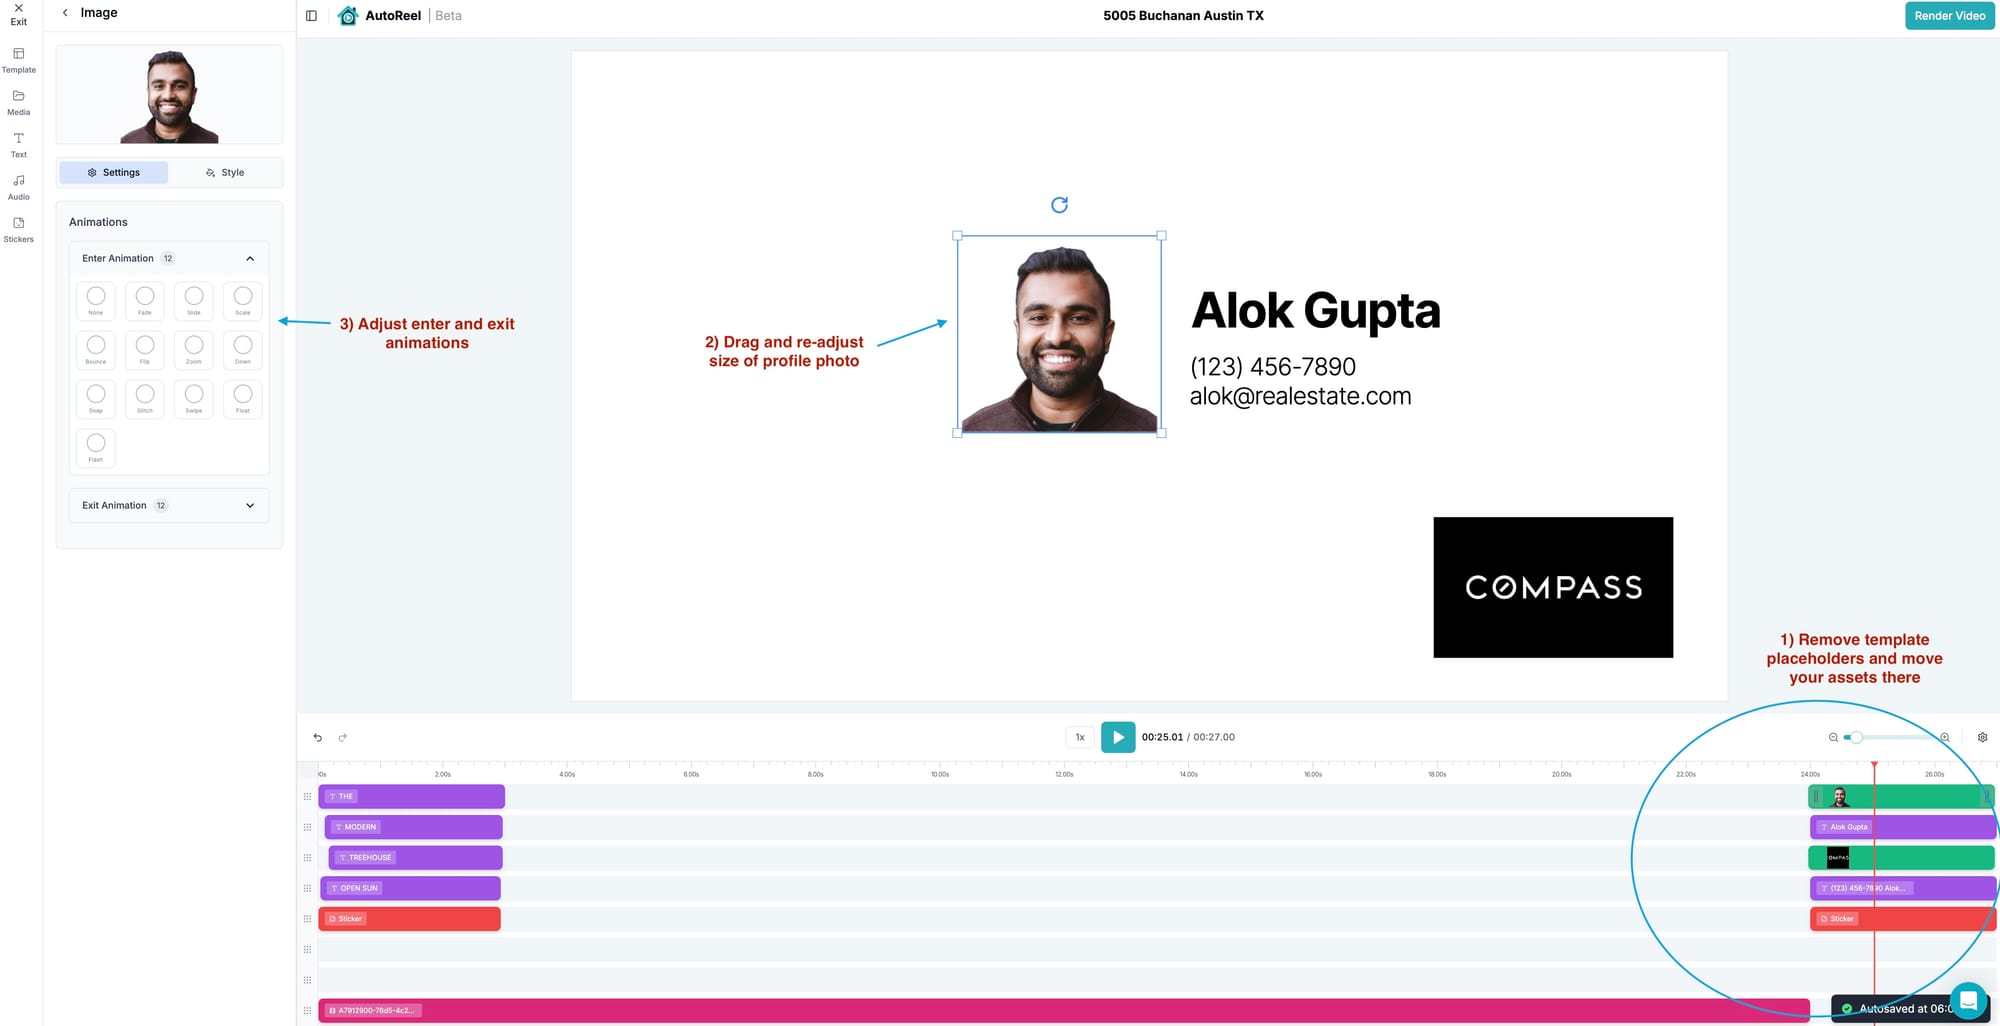
Finalize your Outro details:
- Drag to reposition your profile image
- Replace placeholder info with your name, number, and email
- Swap the logo if needed
✏️ Step 5: Add or Edit More Text in the Video
Click on any text block to update the words on the left sidebar (once the text block is selected in the timeline). There's also many new text-styles you can use to add text anywhere in the video.
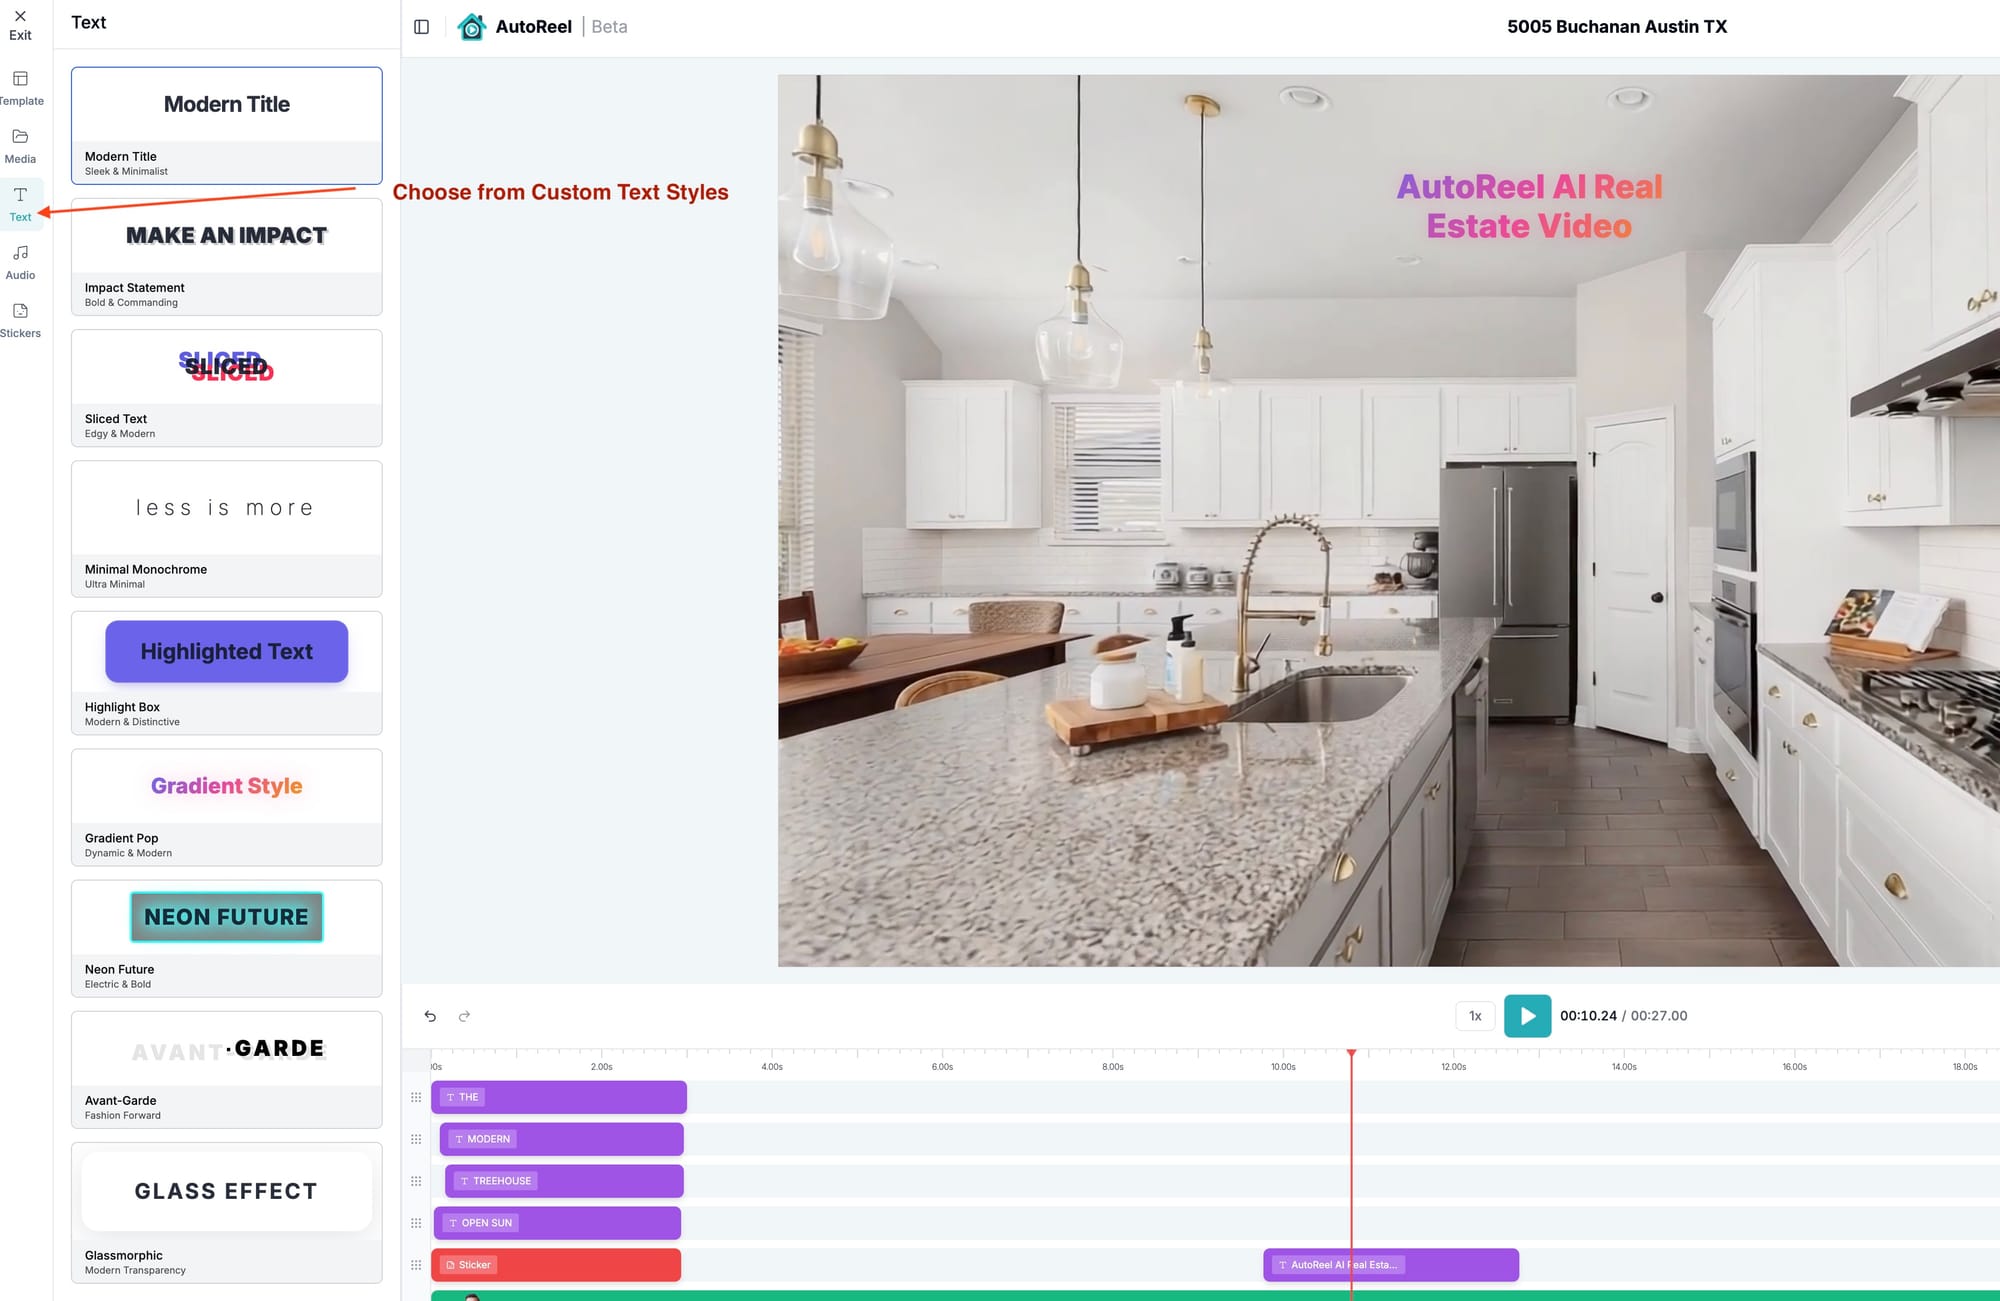
You can:
- Move text blocks to new positions
- Adjust entrance/exit animations
- Customize fonts, colors, and styles
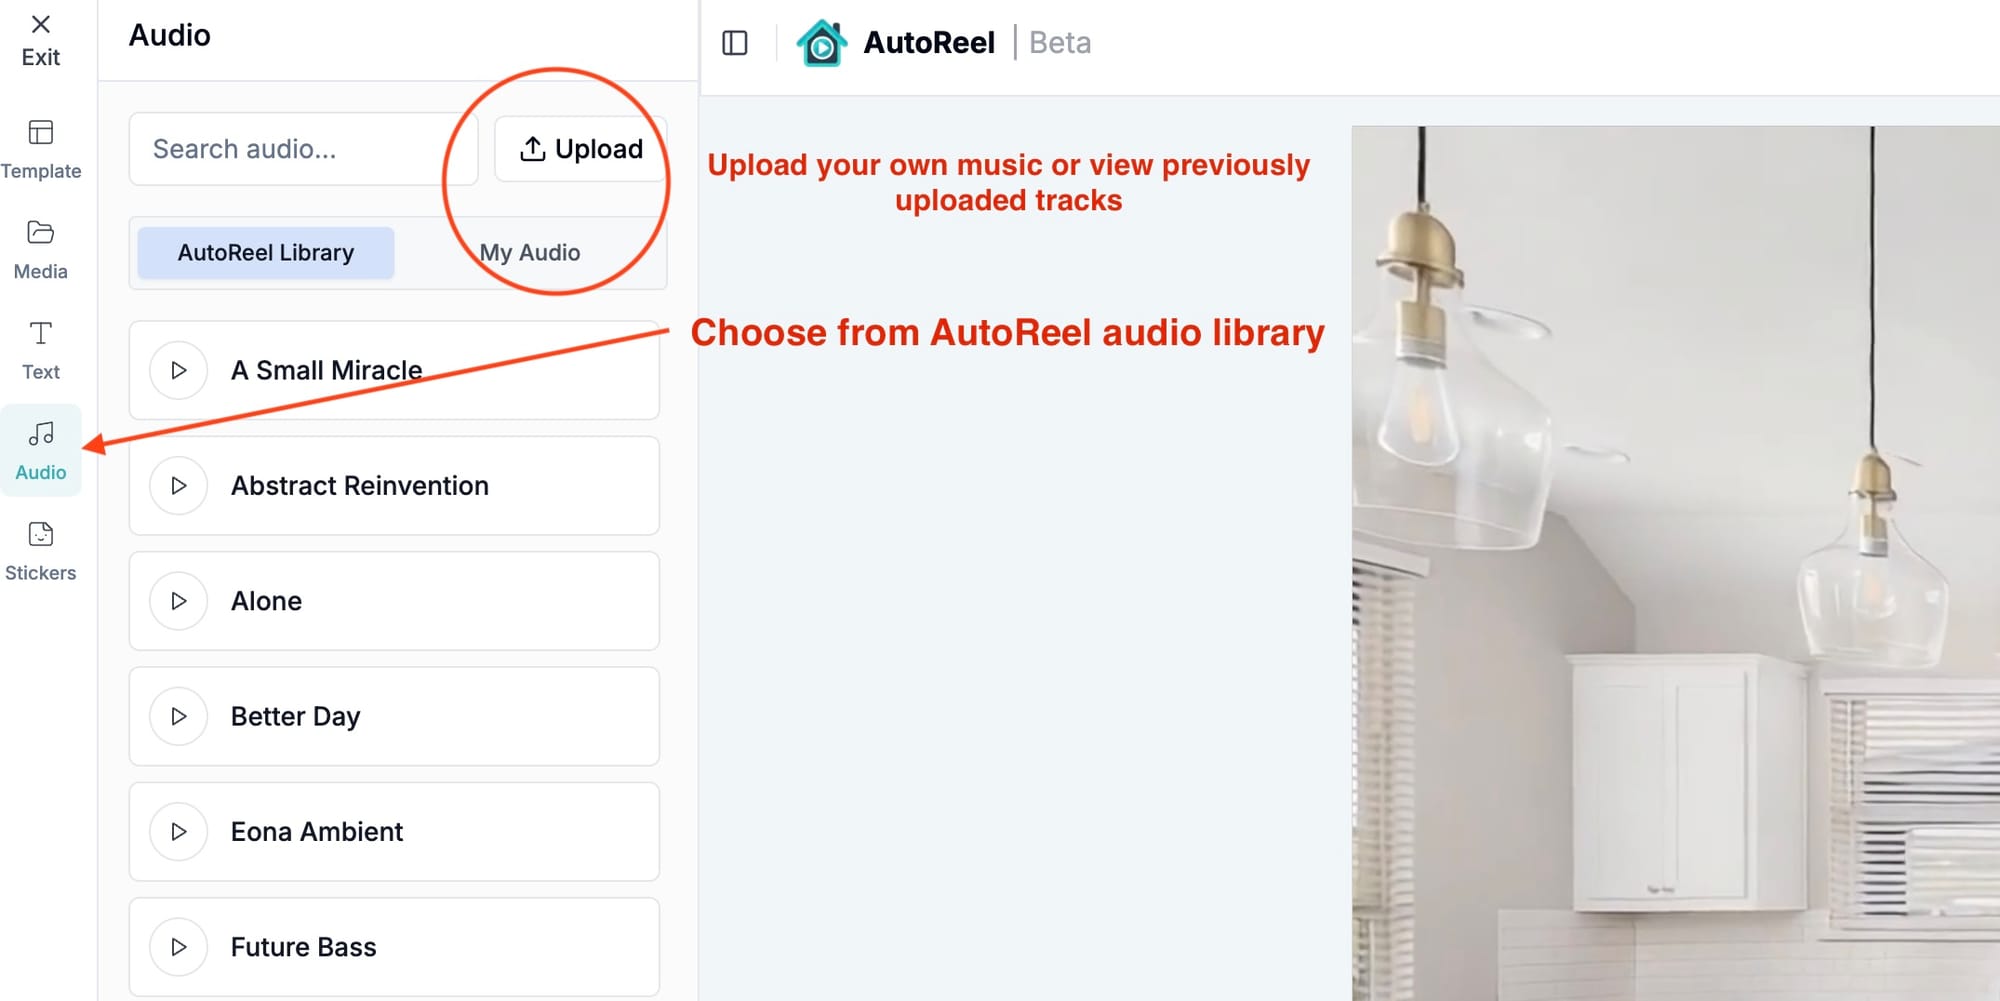
🎵 Step 6: Add or Change Music
AutoReel Studio includes a built-in music library, or you can upload your own background track.
Click the Audio tab and either:
- Browse from our royalty free music collection
- Upload your own audio file
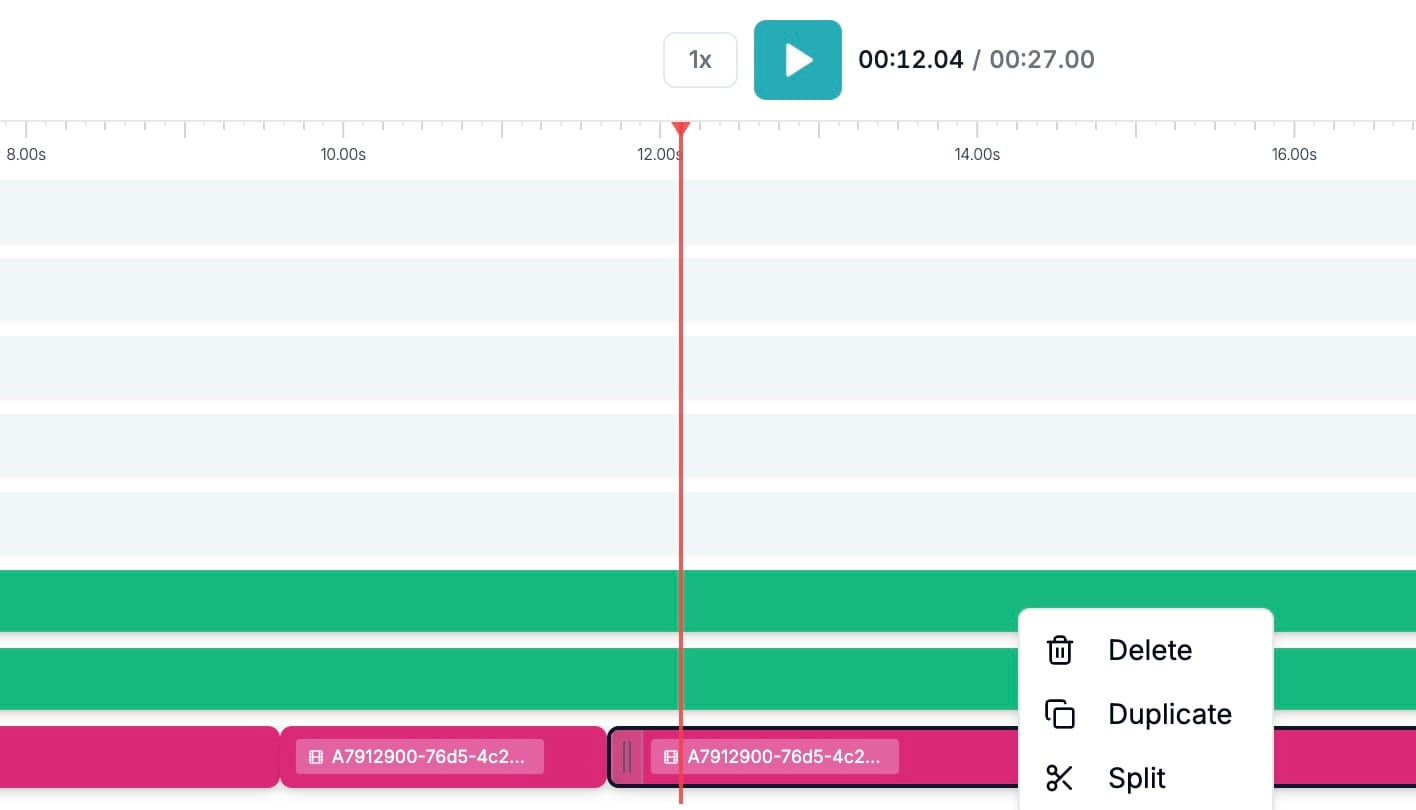
✂️ Step 7: Trim, Split, or Remove Clips
Need to remove a section or re-order clips? Just right-click on any video segment in the timeline.
You can:
- Split a clip at any time point
- Delete a scene
- Duplicate sections to reuse content
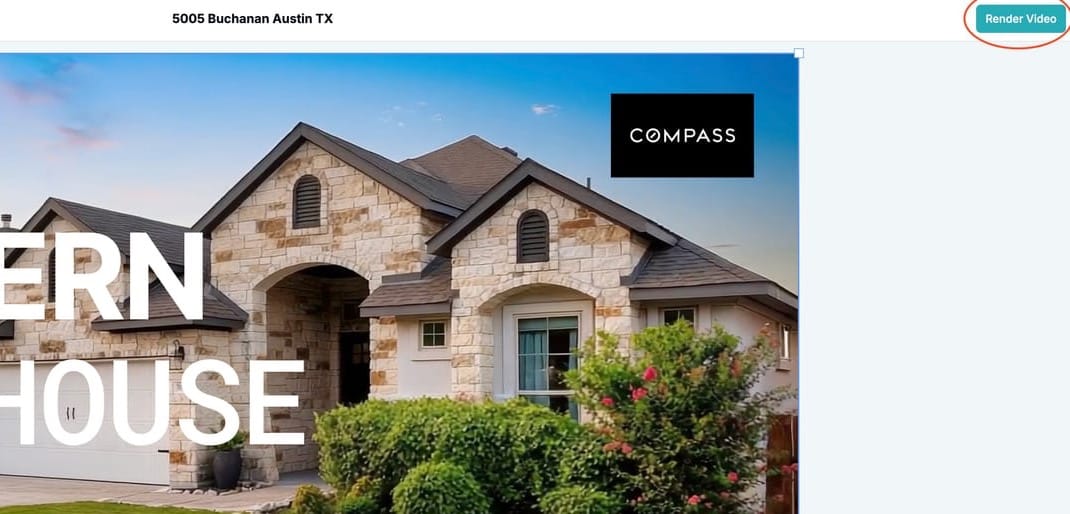
✅ Step 8: Preview and Render
Once you're happy with your changes, playback your video by clicking the play button in the center of the timeline or spacebar. Once you're ready to finalize the video, click the Render Video button at the top right. Your final video will be processed and saved to your AutoReel account, ready to download or share.
🎉 That’s it!
AutoReel Studio gives you full creative freedom, without the tech headache or time.
Whether you're highlighting an open house, elevating your brand, or making quick edits before sharing — it’s all now possible inside AutoReel. No separate software or apps needed. No exporting and re-uploading. Just a powerful end-to-end real estate video platform.
🔍 Need help?
We’re here for you. Hit the chat icon inside AutoReel or contact us.
Happy editing!
Built with ❤️ by the AutoReel team.